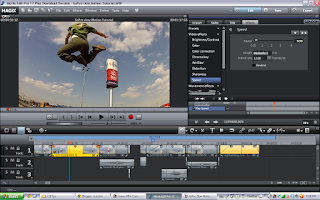
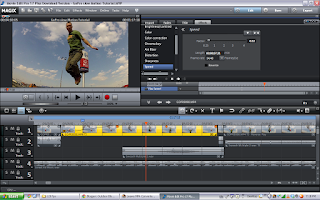
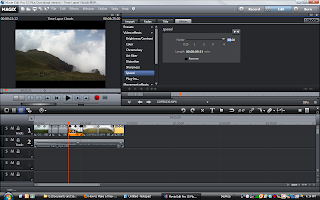
All you have to do is import your high speed footage - GoPro HD 3 shoots in 120 fps - and simply adjust the playback speed factor.
In Movie Edit Pro Plus you go to Effects - Video Effects - Speed.
For slow motion, you simply decrease the playback speed and for time lapse you increase it. However, before doing this, you must ungroup the audio from the video. You can reverse your scene using the same function - check the Reverse box and you're done.
You can also stretch the audio as to get those funny sounds (low sounds or high pitch voices) but that's limited to a certain speed factor.
My Cliff Jumping Video - Showcasing GoPro Slow Motion
How To Make Timelapse Videos with Footage
A time lapse video consists of footage that is rendered in higher speed than that of the original frame rate. It's basically a clip in which everything moves at high speed - or consider it to be the opposite of slow motion video.
The best subjects or actions to video shoot for time lapse are the ones that take time to unfold/develop. There's a ton of stuff like that around you. Here's a list of the most popular things to capture for time lapse video:
- Weather changes - clouds forming and moving, mist and fog, rain, snow layer building up over time.
- Light sources - sunset and sunrise, sun's travel on the sky, the moon, the stars (especially Polaris time lapse), night transforming into day, beams of light penetrating the clouds, etc.
- Fire - a fire consuming the logs and ending in smoke or a fire that grows bigger as fuel is added.
- Tide - the ebb and flow of the ocean or sea.
- People - crowds moving in an open space.
- Construction work - a wall being build, a tall building being erected, crane booms swinging back and forth - all of a sudden a construction site becomes interesting to watch.
- Car traffic - cars running on the roads at night in fast forward mode look cool.
- Artwork - a painter (artist) creating an oil painting or crayon drawing. Computer graphics creations may fall into this category as well.
- Blooming flowers - a rose unfolding it's petals for instance.
- Moisture (water vapors) rising from a lake early in the morning.
- The road ahead shot from a moving vehicle - a rapid glimpse of an entire road trip/journey.
You basically have 2 ways to make timelapse:
- Take still shots every few seconds (also called timelapse photography) and then import all the shots into your editing program.
Make sure to export your video with at least 24 frames per second as for the video to look like a moving picture, not like a sequence of stills. This means you have to have at least 24 shots (JPEGs) in each second. Set your software to import each picture as a certain frame duration (fractions of seconds).
Magix does that pretty well. However, importing still photos means your videos will be in 4:3 format which is not as cool as 16:9.
This is because the GoPro pictures are more like a square whereas the footage is wider, coming in 16:9 format (in all resolutions except R4 which is also 4:3) -
Shoot video for a longer period of time and then simply modify the payback speed or the speed ratio in your editor.
I love this method as it's way more simple and I get the 16:9 format as well. And instead of dealing with lots of files, as when taking stills, you only have one file to work with. Note that you need to remove the audio from the video in Magix in order to modify the playback speed.
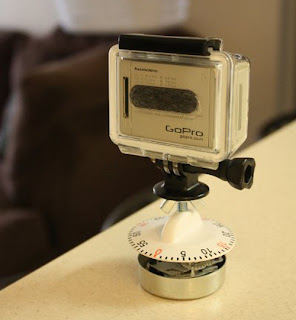
A cool technique you may wanna apply while shooting a time lapse video is to use a kitchen timer on which to mount your GoPro camera. The timer rotates while your camera captures either photos (every 2 seconds) or video - this is your panning effect.
 |  |
Any questions or suggestions? Leave a comment.
Stay cool!
Comments (imported from Highball Blog)
Rip3dAugust 5, 2010 at 5:31 AM
Thanks, yet another interesting and useful article.. I could use this to fast forward some of my rides up to the point I crash on the trail.
Keep these articles coming
Rip3d
------
ConstantinAugust 5, 2010 at 9:02 AM
:-) I hope you ride will be crash-less.
Thanks for the kind words!
------
Cristi MosoraAugust 6, 2010 at 1:33 PM
Arghh, I just can't wait for the time I'll have a GoPro HD camera, and I will start practicing these tutorials :)
------
RaulAugust 7, 2010 at 10:51 PM
Hey casually I use this effect in my last video, constantin! I send you a mail from Vimeo, did you received it??
------
ConstantinAugust 8, 2010 at 10:14 PM
I love the video Raul. You've got skills. :-)
Thanks for sharing!
------
ConstantinAugust 8, 2010 at 10:24 PM
@Cristi - maybe you'll get one for Christmas. :-)
------
.October 17, 2010 at 7:36 PM
Nice timer trick
------
AnonymousApril 9, 2011 at 9:33 PM
Is your video using the kitchen timer done at 2 seconds or another speed?
------
ConstantinApril 10, 2011 at 12:06 AM
Hi, the timer video wasn't made by me. But the guy did indeed what you say: a photo at every two seconds for an hour.
For short time lapse, I prefer to shoot video continuously and then render in high speed. It seems easier to handle a single file in the editor (instead of importing lots of photos, especially with unsophisticated video editing software).
------
AnonymousApril 14, 2011 at 12:53 AM
It's not all just fast forward video. Time lapse is a technique whereby the frequency at which film frames are captured (the frame rate) is much lower than that which will be used to play the sequence back. When replayed at normal speed, time appears to be moving faster and thus lapsing.
------
ConstantinApril 14, 2011 at 12:58 AM
You're right about that! Thanks for your contribution.
------
Michael WAugust 2, 2011 at 7:46 PM
that kitchen timer trick is BRILLIANT - I always wondered how those shots looked so smooth, and imagined an expensive device that only Pros could afford. Great site overall, this is really helping me improve my shooting/editing!
------
ConstantinAugust 2, 2011 at 10:52 PM
Thanks Michael!
Yes, there are lots of tricks one can pull without professional video gear. DIY rocks! :-)
------
DavidAugust 31, 2011 at 6:31 AM
Great site!
Quick tip:
for night/shady timelapse using the GoPro HD, switching to spot metering greatly helps... i also noticed that gopro users use the video for sunset timelapses and just ff the video in the editor...
------
ConstantinAugust 31, 2011 at 9:06 AM
Thanks David! Yeah I use video as well for time lapse - I like the 16:9 ration better plus it's faster to render the clip.
------
doviidOctober 3, 2011 at 4:52 AM
GREAT BLOG!!!
i was just wondering how you combine all the photos in Magix Pro Plus 17 to make a timelapse. I've left my gopro to take pics in 2 sec. intervals. It is done shooting, but when I try to combine all the pics in Movie Edit 17 i end up with spaces in between each pic. and I'm having a hard time changing fps so im ending up with like 4 hour vids... even when i export at like 30 fps. Well great blog and thank you for your help>!
------
ConstantinOctober 3, 2011 at 2:37 PM
Hey Doviid! Thanks for your question.
Fist thing: you open a new Magix movie project for your time lapse video. You go to Settings (the two gear wheels in the upper left corner) - then go to Video/Audio tab.
At the bottom of this window there are two fields named Standard Picture Length - select "1" in the Picture Length field and the select "Frames" in the second field. Click OK.
Then go to your Import tab - select all photos which you want to add in the timeline (click on fist picture, hold Shift key, scroll down to the last picture and select that as well). Now drag all selected images into your timeline.
Each picture will only last one frame. So, if you export at 24, 25, 30 fps - you'll get to view 24, 25 or 30 pictures in one second. If that's too much for you, you can select a larger number of frames per image (2 or 3) in the Video/Audio tab (in the Settings window).
Hope this helps.
Let me know. Cheers!
------
doviidOctober 6, 2011 at 2:26 AM
Thanks for your help, my time lapses turned out sick at 30fps! With 5 and 2 sec intervals, i first exported with images as an image for 1 frame. And then i started a new project, imported the first one and made the speed like x3,000 it was sick thank you for all the help! Great glidecam too!
------
ConstantinOctober 6, 2011 at 9:18 AM
Awesome! Send the video as a response to me on YouTube.
Always glad to help.!
------
AnonymousOctober 15, 2011 at 1:48 AM
What fast forward speed do you use with your video to get the time lapse effect?
------
ConstantinOctober 15, 2011 at 8:12 PM
It depends on what effect I want to convey. If the action develops really slow then I increase the playback speed to 50 or even 80 times.
It's not a rule. You can do some tests, exporting the same clip in say 10, 30 or 50 playback speed factor and then you decide which you like best.
------
MarianoMarch 21, 2012 at 9:50 PM
I have used the Twixtor plugin with sony vega for this video at 60 fps
http://vimeo.com/34744805
------
Replies
ConstantinMarch 22, 2012 at 12:18 AM
Nice! You need a better subject to get the best out of Twixtor.
Try a single moving subject contrasting on the background. Like I have my silhouette against the sky.
Hope Magix is gonna integrate Twixtor soon enough. That'll be a kill! :-)
------
UnknownJune 4, 2012 at 7:57 AM
if I only have the GoPro HD and record in 720P 60fps, doe the software do a good job at slowing it down and making it look clean and smooth?
------
Replies
ConstantinJuly 8, 2012 at 2:22 AM
Yup. You can slow it down to 15 fps and it'll look smooth.
------
Charles MiskeAugust 14, 2012 at 10:10 PM
Audacity is free and allows you to speed up or slow down sound without changing the pitch. Once you ungroup it export it, then open in Audacity and in Effects, select "Change Tempo". The settings are roughly based on % of increase or decrease, and won't really match anything like the timing of frames in your video editor, so you'll have to mess with it a bit to make your sound file the correct length. When satisfied with your results, export as a wave and import it back into your video project.
------
Replies
ConstantinAugust 15, 2012 at 9:45 AM
Awesome!
I use Audacity to 'crop' audio from YouTube videos :-). I had no clue one could do this.
Thanks, Charles!
------
RobSeptember 3, 2012 at 5:08 PM
I also tried to make a nice slomo with my Hero2, but the shot in 120frps look awfull and the 720/60frps mode isn't slow enough. if I try to make that slower you'll see errors in the shot. How do you get these Nice looking slomos with your GoPro?
------
Replies
ConstantinSeptember 3, 2012 at 5:52 PM
Well, shoot in a higher frame rate: 60 fps or 120 fps with your HD Hero 2 - that's a must if you want smooth video in slow motion (must have a high frame rate footage).
Then, slow down the footage, depending on what software you use - I recommend Magix for ease of use - but not lower than 15 fps.
Then simply export your clip.
Click here for my full workflow on video editing.
Hope this helps, Rob. Let me know.
------
RobSeptember 5, 2012 at 2:35 PM
Thnx for the help and quick response Constantin.
I've made a slomo with 60fps footage, and it looked alot better! But the shot is moving, so you'll see alot op movement in the background of the shot...
Is it true that you can only make nice slomos with a still shot?
------
ConstantinSeptember 5, 2012 at 3:18 PM
Indeed a steady camera is better for shooting slow motion. But that's not a rule.
You can move the camera with the subject but try not to move it too much. That's why a rig or a steadicam is recommended.
When I shoot handheld, I hold the cam with both hands to get a steady shot.
------
RobSeptember 5, 2012 at 8:15 PM
Thnx for the helpful tips Constantin!
I''ll to get some cool slomos in my next clip. I just recently finished a clip of a roadtrip, me and my friends did this summer. Maybe you would like to see it. If you do watch it, please let me know what you think!
All the best,
Rob
http://youtu.be/2_VyidnwKFY?hd=1
------
ConstantinSeptember 5, 2012 at 11:58 PM
Rob, that's an amazing edit!!! I love it.
It seems strange to ask me these questions - to me, you're a pro. Editing on music beats, color correction, effects and all - I mean, you know how to edit videos. Period.
Congrats for your tours and for a wicked clip!
------
RobSeptember 8, 2012 at 5:35 PM
Haha thanks!
Editing is my job... So that explains a lot I guess.
But I got this GoPro to just have some fun and edit some personal things. I just didn't manage to get some good slomos.
And it's always good to share knowledge, so if you have questions let me know on my YouTube account!
Cheers!
------
ConstantinOctober 10, 2012 at 1:35 PM
Sure thing, Rob.
------
SCsabaSeptember 19, 2013 at 11:50 AM
Hi!
Very good what you 're doing.
You want to create, Time Lapse panning http://www.ikea.com/ro/ro/catalog/products/30066725/
from this It will work well kompakt camera 367g?
------
Replies
Constantin GaborSeptember 19, 2013 at 1:06 PM
Cheers! Yup, the kitchen timer works well for small cameras.
Delete
If you enjoyed this article, click to get free email updates.
You like my stuff? Help me out and spread the word. Share this. Thanks!


0 comments :
Post a Comment
Please use your personal name. Any business names or irrelevant links will be considered spam. Thanks for joining the conversation!